The liblab configuration file
The liblab config file, with a default name of liblab.config.json, contains configuration used by the liblab CLI to generate SDKs.
As a bare minimum, you need to set the location of your API spec in the config file:
{
  "specFilePath": "https://exciting.soda/openapi.json"
}
You can then add additional options, such as the SDK languages you want to generate, or what authentication your API uses.
{
  "specFilePath": "https://exciting.soda/openapi.json",
  "languages": [
    "python",
    "typescript"
  ],
  "auth": [
    "bearer"
  ]
}
The config file containers a large number of options to allow you to customize the SDKs you generate. One of the most powerful features of liblab is this ability to get fine-grained control over the SDK generation process.
The liblab CLI uses a configuration file instead of extensions in your API spec to allow you to keep a separation between your spec and SDK generation. This provides one source for the configuration, and allows you to quickly make changes without having to redeploy your API if your spec is created by your API gateway.
The config file is created when you run the liblab init command.
Config file naming
By default the config file is named liblab.config.json, and is located in the root of your project. When you run CLI commands such as liblab validate, liblab build or liblab pr, the CLI will look for the config file with this name in the current working directory.
You can change the name and location of the config file by passing the --liblab-config option to the CLI commands. This supports local and remote config files.
liblab build --liblab-config ./soda-api.liblab.config.json
liblab pr --liblab-config https://raw.githubusercontent.com/exciting-soda/soda-api-control-repo/main/soda-api.liblab.config.json
The specFilePath option in the config file is always relative to the current working directory that the CLI is being run from, not relative to the config file location.
Structure of the configuration file
The config file defines the SDK to create along with configuration based off your API, and sections for generic customizations, language specific customizations, publishing, and configuring validation.
Expand to see an example config file
{
  "sdkName": "ExcitingSoda",
  "specFilePath": "https://exciting.soda/openapi.json",
  "languages": [
    "java",
    "python",
    "typescript"
  ],
  "auth": [
    "bearer"
  ],
  "customizations": {
    "authentication": {
      "access": {
        "prefix": "Bearer"
      }
    },
    "generateEnv": true,
    "license": {
      "type": "MIT"
    },
    "retry": {
      "enabled": true,
      "retryDelay": 150,
      "maxAttempts": 3
    },
  },
  "languageOptions": {
    "typescript": {
      "npmName": "ExcitingSoda",
      "npmOrg": "ExcitingSoda",
      "httpClient": "axios",
      "bundle": true,
      "exportClassDefault": true,
      "githubRepoName": "exciting-soda-typescript-sdk",
      "sdkVersion": "1.0.0"
    },
    "python": {
      "pypiPackageName": "ExcitingSoda",
      "alwaysInitializeOptionals": true,
      "githubRepoName": "exciting-soda-python-sdk",
      "sdkVersion": "1.0.0",
    },
    "java": {
      "groupId": "soda.exciting",
      "githubRepoName": "exciting-soda-java-sdk",
      "sdkVersion": "1.0.0"
    }
  },
  "publishing": {
    "githubOrg": "exciting-soda"
  }
}
Config file validation and autocomplete
liblab has published the schema of the config file to the Schema Store. This means that you can use the schema to validate your config file in your IDE, and get autocomplete for the options.

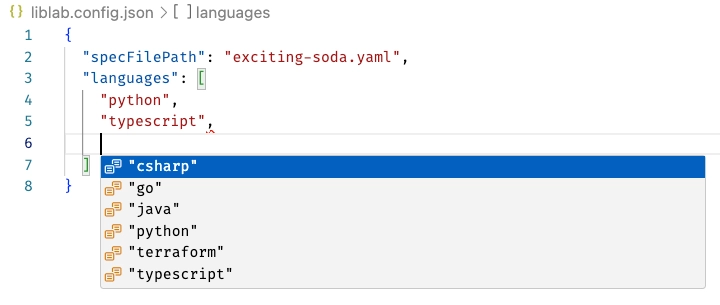
To detect that this is a liblab config file and provide autocomplete, the file must be called liblab.config.json, or end with liblab.config.json, such as exciting-soda.liblab.config.json.
Depending on the IDE you use, you may need to do some additional configuration to enable this.
-
In JetBrains IDEs, the schema should be detected automatically.
-
In VS Code, you will need to install the JSON Schema Store Catalog extension, either from the Extensions view, or by running the following command in the terminal:
code --install-extension remcohaszing.schemastore -
For other IDEs, check the documentation for how to enable JSON schema validation.
Configuration file sections
Each section is described in more detail in the following documentation: